Wednesday, April 29, 2015

Super Easy Picture Frame


I have wanted to create a photo wall for a long time. Well, that's not completely true, I have a photo wall, but it's your everyday frames that anyone can have. I want something with personality. So I looked into having all my favorite pictures turned into canvas prints (too pricey) and I looked into the transferring photos to wood tutorials (kind of pricey and my printer is always on the fritz); nothing seemed to be what I wanted. So, I give you my quick and easy way of turning your photo wall into something unique (with a pop of color).
 

So first, you'll need your favorite pictures and a wood blank of some sort. I sell some of these shapes on facebook (here).

Trace the shape onto your photo and cut inside the pen line as close as possible. If you cut right on the line, you'll be able to see a shadow of the line.

Then, you'll need your pop of color paint, sponge brush (I actually used a sponge for both brushes) and some Mod Podge. I use the gloss for everything. But there are tons of different Mod Podge finishes and it's not really important for this project.

Paint the edges of your shape. It's okay if it gets on the top, just make sure you smooth it out so there aren't lumps under your picture.

After the edges are mostly dry, cover the surface with Mod Podge. I used a pretty thick layer, but not too much or it'll drip out the side. You don't want to get any on the painted edge.

Pop your picture on and press it out. I used a pan scraper (dedicated to my craft room) to get it really pressed down. You could also set a heavy book on it for a while. Add a saw tooth hanger to the back and hang it on your wall. We will hopefully be moving in the next year, so when I have my new space, my wall will be covered in these unique shapes with a pop of color. I'll come back and update!

Tuesday, March 24, 2015

How to do a Chevron Stencil without any bleeds

 
I've been asked to do a chevron stenciling tutorial a couple times and I'm just now getting around to actually doing it. When I first started painting things more complex than just solid or distressed, I was constantly running into bleeds. It's so silly because this is really really easy; I promise!
First I painted the front, back, and sides with 3 coats of my base color. Do this with the lighter color of the two shades you plan to use. You could do this with more than one color too, so just paint the base color the color you want to have every other stripe. Wait for the base coat to be really dry. You can test this by pressing your finger nail into a small area; if it leaves a dent, it's not dry enough yet. Mine dried for about 3 hours.
 
I then cut a full 12x12 sheet of contact paper in a chevron pattern on my Silhouette Cameo. I also just heard they have chevron Frog tape. I googled it quick, and I like my chevron to be a little taller, but the tape will work the same way if you don't have a machine to cut contact paper with.
 
Then you just place your contact paper. I don't use any transfer tape. Contact paper is pretty forgiving. If it sticks to itself, it usually peels away from itself pretty easy. To keep them evenly spaced, I temporarily place a piece where I don't want it.
Easy!

Then I take my scraper make sure the edges are pressed on really well. Now, I can't believe I forgot to take a picture of the most important part! After you have your chevron on, you are going to paint the base color again over the entire thing. This seals the stencil and if there were any places not quite pressed down enough, it won't bleed through with your next color. This can be a very thin coat. Just enough to cover and seal the edges of your stencil.

I wait till the sealing coat is mostly dry and move quickly through the next couple of steps. I paint my next color(s) on letting them dry slightly in between each coat. This time I did three coats of the brown to get a good coverage. Maybe 5 minutes of dry time between each coat. While it's still tacky, peel your stencil off...


...and you should be left with beautiful, bleed free, chevron!

To pick up an already painted bunny, head on over to The Sensory Emporium!

Monday, March 9, 2015

Another Quilt with Lots of Meaning AKA Brick Quilt Part 1

I have a confession to make. I'm not a quilter. I only pretend to be because it gives me opportunities to make beautiful and memorable gifts. Like the time I cut up my bridesmaids dress to make my best friend the most amazing quilt.
 

Or twice that I've cut up my kids' first year of clothes to make them a blanket. But as I thought about this blog and took pictures for the next tutorial, I thought, does quilting really have to be about skill? Do you really have to know all the terms and techniques to make a really cute blanket? I have came to the conclusion that no, no you do not. I make memories. I make blankets that help the receiver hang on to the last few memories of one special day, year, or person. So, now that we've established that I might be a quilter, lets move on...just know, you probably aren't getting the right terms and there is most likely a tutorial out there better suited for you, but these are my blankets and I love them.

So my sister's grandpa passed away a few months ago (don't ask how he isn't also my grandpa, it's a really long story). She approached me shortly after to see if I could make a quilt out of his old button up shirts and jeans. Knowing that I love to make these types of quilts, I said yes. Then they got here and I kind of freaked out a little bit. If I mess this up, I have no way to replace these shirts. And then I thought, I can't just do the regular old squares and stitch them together. This quilt has to be epic because I'm a little crazy like that and think I can do awesome things.

So I started with this pile of shirts. Irreplaceable button up shirts. That still smell like her grandpa's closet. And I researched quilt patterns. Lets keep in mind that I'm not really a quilter. I can't do all those fancy things. I finally decided a brick quilt would be easy and different from the traditional squares I usually do.
I started by cutting along all the seams. So I ended up with the back piece, two front pieces and two sleeves. I got rid of all the collars and pleats.
Then I squared all my pieces up. It was really nice because I had lines to follow. Cut off cuffs and buttons and any area that is thicker.
 
 Then I started cutting the bricks. I cut them 4.5x7.5. I also preserved the pockets by cutting them 7.5 by 9 so they were the same as two bricks. Make sense?


I ended up with 138 bricks. Some shirts I got more and some a little less. The average amount of bricks was 23 from each shirt.
 
Stay tuned for assembly and to see if this quilt turns out the way I'm imagining.

Friday, February 13, 2015

Laminante Table Top Makeover

Our dinning room table was a garage sale find 6 years ago. It's served us well, but it was falling apart! So I had two choices, make it over or buy a new one. Option 2 really wasn't even in the running. We'll be moving soon and I don't know what my dining room will look like. What if I have a huge dining room and I purchase one for the size I have now. Plus, I have a 5 year old and a 3 year old; I'm just not ready to invest in a forever table.

See, it's sad. And that taped area, gross! I felt like food and grossness was getting under the tape. Ewww! Something needed to be done.
See ya later old icky table. We've seen some happy crafting together (paint splotches) and some happy family memories (more to come), but it's time for you to go!
The happy tools I used for the job. I used my iron to heat it up, the knife to get under the laminate in tougher spots, and the sanding block after it was all off.

For the most part, it peeled right off. The edges caused me a bit of trouble. There is a lot of glue on the edges. Heat just seemed to make it stick. Uh-oh, did I just start a project I can't finish?

 Not happy with the edges, but I came up with a plan...you'll see.
On to the next step. My table was particle board underneath. So I sanded it. Tools for this step are a paint pan (I used a plate), mini roller, and satin paint. I did three coats. I sanded between every coat.

After one coat.

Next step is the fun part! Figuring out what you want the top of your table to look like. I wanted fun, bright colors. I got 4 colors of acrylic paint, 4 brushes, masking tape, and duct tape (that's for later).

Tape off your design. I'm just doing stripes, so I taped off straight lines and labeled each section with what color it'll be.

Paint again! So bright and fun!

My favorite part is the reveal. I love peeling the tape off and seeing the result. Now, remember those pesky edges that the laminate just wouldn't come off? Duct tape! There are so many fun duct tapes out there. No more ugly edges!

Looking good, but I just needed a little more something.

Painted placemats of course! And the best part, the kids' placemats are chalkboards!

All done! And so much nicer. No more ugly tape, no germs getting stuck under tape. I'm so in love! Maybe this will be my forever table.

Thursday, November 13, 2014

Stocking Stuffer Checklist with Printable

So now you've seen DIY Stocking Stuffers and you've seen a bunch of stocking stuffers from amazing Etsy sellers, but you still have a few more last minute goodies you want to get from the store. Now what to pick up?  Here is a printable check list to cover Stocking Stuffers for toddlers, teens, mom, dad, and kids. Print it out and either leave it a full sheet or cut out the 3x3 squares for a mini check list.

https://drive.google.com/file/d/0Bzzc8fCBRUNjeTNCSDh2YkxlSGc/view?usp=sharing
 
Click the image above to get the full document.
 
I hope you enjoyed my first mini series of a bigger series. Stay tuned for Gifts for Mom!


Tuesday, November 11, 2014

DIY Stocking Stuffers

http://tennisfixation.com/2012/12/best-last-minute-gifts-and-stocking-stuffers-for-tennis-players.html/christmas-stockings-tennis
"And the stockings were hung..." Yesterday we featured some awesome Etsy shops and their stocking stuffers, so visit that post if you didn't see it!  Today I'm talking to the DIYers of the world. All of you who want to put that extra special touch to your gift giving. 


Please note as your read, I do not own any of the pictures shown. If you click on the picture, it should take you to the original blog or source. Show these bloggers some love by visiting their blog and pinning!

First up, Homemade Bath Crayons. Who does love to draw in the bathtub? I've been known to steal my kids' bath crayons and write little messages to my husband! Head on over to DIY Natural to see how to make some at home.
http://www.diynatural.com/homemade-bath-crayons/?awt_l=7fIUI&awt_m=3kDomG4BHktFQkt
 
Kids are going to LOVE this one. Glitter Slime! 
http://www.the36thavenue.com/how-to-make-glitter-slime/
 
One of my favorite gifts to give, Hot Chocolate. These are so easy to put together and a great gift for just about anyone. This blogger even includes an awesome printable for Snowman Soup.

http://www.glorioustreats.com/2013/12/snowman-soup.html

 
 Another creative way to give hot chocolate, these DIY Chalkboard Mugs. These are so cute! I imagine giving these to my husband and writing little messages for him in the morning.
http://www.prettyhandygirl.com/diy-chalkboard-painted-mugs/

It was way harder to find a DIY Men's Stocking Stuffer than I thought it would be. Luckily I came across these awesome DIY Meat Rubs!
http://www.handjobsforthehome.com/2011/06/diy-bbq-rubs/
 
Then I found a classic stocking stuffer for men, coupon books. These are quick and easy to put together. This blogger even includes a free printable!
http://www.stayathomeartist.com/2011/02/made-with-love-coupon-book.html
 
Teenagers are always hard to shop for, but you can't go wrong with this cute stocking stuffer! 
 Another generous blogger, she includes a free printable too!
http://ivyinthebay.com/2012/12/17/for-your-mistle-toes-free-printable/


 Or, every teen likes getting money. This makes it a little more giftable. This blogger has a ton of cute ideas for wrapping up money.
http://room-mom101.blogspot.com/2011/12/creative-ways-to-give-money-at.html
 
Don't forget about mom! Sugar scrubs are perfect for the mom that deserves a nice relaxing treat. This blog had some really great recipes; I'll definitely be revisiting this blog to make some for myself!
http://www.colorsofmae.com/blog/2013/12/29/sugar-scrubbing-every-care-away
 
This next one was from one of my Silhouette Challenge blog trains and is one of my favorite DIYs. If you don't have a Silhouette, this could easily be done with hole punches. I LOVE it!
 
http://www.thinkingcloset.com/2014/03/10/ombre-paint-chip-earrings-free-cut-file/
 
Another quick gift for those of you with a die cutter. There are still a lot of us who like to crack open a fresh new book and we definitely need a bookmark in our stockings!
 
http://www.getsilvered.com/2014/08/damask-bookmark-or-overlay-free-file-friday/


Can't forget to include the jokesters out there. I LOVE this idea. 
 
http://www.thinkingcloset.com/2014/03/20/chill-pills-gag-gift-silhouette-giveaway/
 
 
I hope you enjoyed this post and it has inspired you to get out there and make some Christmas gifts. For quick and easy repining, click here.


Monday, November 10, 2014

Stocking Stuffers Found On Etsy


Welcome to my first blog of a series featuring all about Christmas! Over the next couple weeks, I'll have featured etsy shops, DIY gifts and more! Today I'm starting with Stocking Stuffers found on Etsy.

I love supporting small businesses. I understand what it takes to run a small business. What it means to stay up way too late to make sure you get your orders out in time. The thrill and sometimes anxiety that comes with hearing a cha-ching on your phone. So this year, I'm striving to make my Christmas a handmade or found on Etsy Christmas. Join me in supporting small businesses this year.

As your browse through these great Etsy listings, remember, these pictures are not mine. I know you're going to want to shop, so I've made it easy for you. Just click on the picture and you'll be taken right to the shop.

Unique Stocking Stuffers for Anyone

https://www.etsy.com/listing/152063976/mustache-light-switch-cover-rainbow
Are you shopping for someone who has everything? Head on over to Couture Light Switches for some unique light switch covers starting at just $6.95!
https://www.etsy.com/listing/202057748/its-so-easy-being-green-colorway-100g
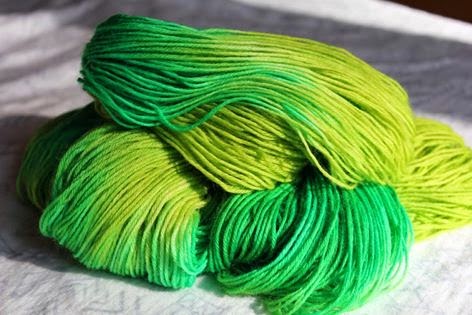
I think everyone knows someone who knits or crochets and it seems like they already have all the yarn they'll ever need. However, I found this hand dyed yard over at Groovy Hues and I can bet they don't have this yet! So awesome and I love the name for this one, "It's So Easy Being Green"
https://www.etsy.com/listing/206368838/gingerbread-man-soy-wax-melt-wax-tart?ref=shop_home_active_11

Having a house that smells like the holidays always brings back the best memories. Head on over to Emmazing Scents and shop. When you buy 5, you get 1 free!!

https://www.etsy.com/listing/181854037/aromatherapy-candle-relax-revive

When the holidays are over, you're going to need this aromatherapy candle to Relax & Revive - Lavender, Rosemary and Peppermint aromatherapy candle with a choice of wood wick for a gentle crackle giving a slight scent of wood or cotton wick. Stop over to Simply Pure Butters for some more yummy candles!

http://www.cowgirlgems.com/
Don't forget about making your car smell fresh! Head on over to Cowgirl Gems to choose from 20+ scents and different shapes!
 

Stocking Stuffers for Her

https://www.etsy.com/shop/TheJoyfulJewelryBox?ref=l2-shopheader-name

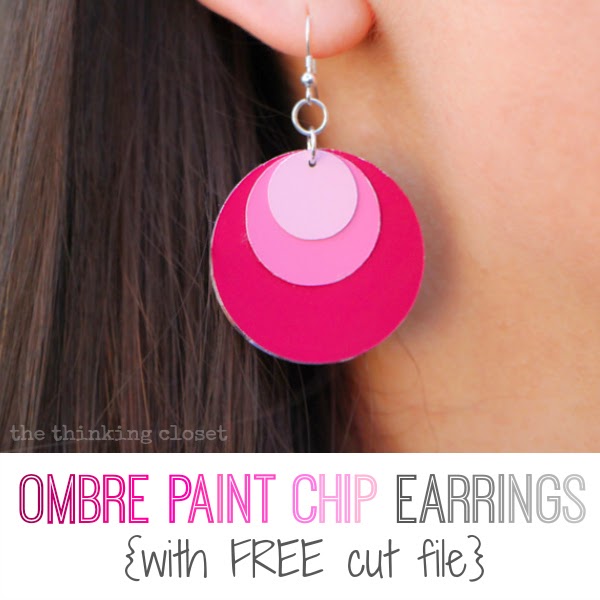
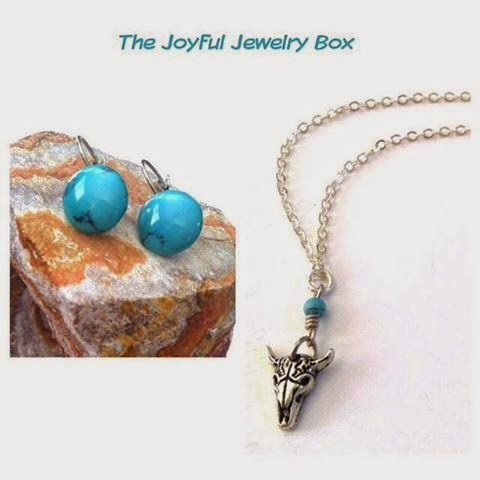
Etsy also has some very unique jewelry options, like these turquoise pieces from The Joyful Jewelry Box.

https://www.etsy.com/listing/179865209/silver-spiral-and-agate-earrings
Here's another neat jewelry find found over at Fiera Fashions!

Stocking Stuffers for Him
https://www.etsy.com/listing/183522856/engraved-wallet-card-personalized-wallet?ref=sr_gallery_27&ga_search_query=Stocking+Stuffer+for+him&ga_search_type=all&ga_view_type=gallery
I really LOVE this idea! Every time the man in your life sees this, he'll be reminded of you and the life you have together. I'm definitely picking one of these up from Message Me This soon!

Stocking Stuffers for the Kiddos

https://www.etsy.com/listing/209845251/knot-headband-baby-headband-retro?ref=shop_home_active_3
Oh my goodness! This little girl is so cute, but take a look at her simple, comfy, everyday wear headband! I just love it and I know you will too, so skip over to Cara's Custom Tutus to get one for your little girl!
 
https://www.etsy.com/listing/208254326/christmas-elf-felt-puzzle
I stopped over to Alaska's Adornments and found some super cute stocking stuffers like this felt elf puzzle. It's the perfect way to keep the kiddo's busy on the way to Grandma's or keeping the early birds occupied till everyone else wakes up!

https://www.etsy.com/listing/207886795/merry-kissmas-lip-balm-holder-stocking
Also over at Alaska's Adornments, she had these cute lip balm holder. Perfect for all the girls you're shopping for, young and old!
 
https://www.etsy.com/listing/101901622/crayon-roll-lazy-daisy-24-crayons-easter?ref=sr_gallery_18&ga_search_query=Crayon+Roll&ga_search_type=all&ga_view_type=gallery
Another great way to keep the kiddos busy (and organized) are crayon roll ups. I found this adorable one over at Paper From Heaven.


Stocking Stuffers for Teens

https://www.etsy.com/listing/130676548/crochet-boot-cuffs-packaged-for-gift?ref=sr_gallery_1&ga_search_query=Boot+Cuff&ga_search_type=handmade&ga_view_type=gallery
 
I've said it before and I'll say it again, Teenagers can be so hard to shop for! But you can't go wrong with these boot cuffs from Boot Cuff Susie! They are sure to bring on the ever so rare teenager smile.
 
https://www.etsy.com/listing/197913064/sales-boy-kid-teen-keychain-black-faux?ref=sr_gallery_40&ga_search_query=keychain+for+teen&ga_page=2&ga_search_type=all&ga_view_type=gallery
And if you thought it was hard to shop for a teen girl, finding something cool enough for a teen boy is even harder! Luckily, I found this cute (I mean totally cool!) key chain wallet over at Hello Petronille.

Of course shopping for stockings stuffers wouldn't be complete without also shopping for stockings. Here are some of my favorites from Etsy. All the links are over on my pinterest board below or linked to each individual picture..


To quickly view all these links and more in one place, visit my pinterest board here.


Image Map