Friday, June 7, 2013

Guest Post from Amelia And Me Crafts!

How do I love my Silhouette Pen Holder by The Sensory Emporium? Let me count the ways…

Hello everyone! Jennifer here from Amelia & Me Crafts. I wanted to show off a recent project I made using the Silhouette Pen Holder by The Sensory Emporium. I purchased my pen holder back in February and it has quickly graduated to being one of my go to tools.

Scrapbooking is my first love, so I want to show you how this pen holder can help you with titles, journaling, details, etc. I have completed a scrapbook for each of my 3 children chronicling their first year. Benjamin, my third child, just turned 4 and I am STILL working on his first year scrapbook – but that is a topic for another blog post.
I like to add a ‘Watch Me Grow’ layout to these special scrapbooks. It includes 13 pictures - a newborn picture and one for each month. I just put the finishing touches on Benjamin’s layout. Ta-Da!
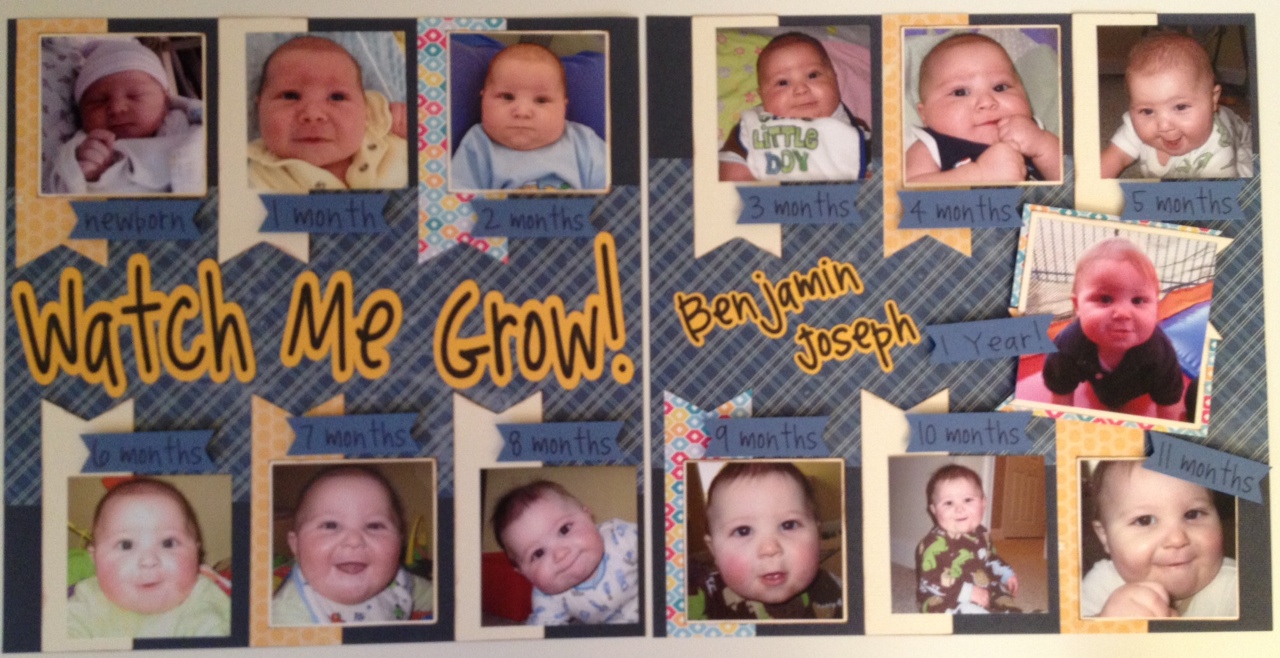


Let’s break it down. How did my Sensory Emporium pen holder help in this layout? It made journaling the month banners easy peasy AND nice and uniform with a black Sharpie Ultra Fine Point. Quick mention, my font of choice for this project is Aunt Jana Sketch, which can be found in the Silhouette Online store (click on Aunt Jana Sketch to go right there.)


For the titles, I switched over to a black BIC Mark•It fine point. I have to tell you, these markers fit like BUTTER in the pen holder. You do have to adjust the height of the pen holder a bit so that the marker does not drag across the paper. It is recommended to put a popsicle stick between the paper and the tip of the marker to get the proper spacing, then lock the holder in. I just eyeball it. Note the space between the pen holder and the blade carriage below. One of these days I will get a popsicle stick that does not have sticky remnants on it.


For the name title, I wrote out Benjamin Joseph in my Silhouette Studio software, then applied an offset. First step is to change the cut style to ‘no cut’ for the offset because I do not want the Cameo to sketch the outer edge. With the cut style set to ‘cut’ for ‘Benjamin Joseph, I loaded the pen holder into my Cameo, made the necessary setting changes and sketched out his name – as shown in the above picture. To cut it out for my scrapbook page, I shut the cut lines off for ‘Benjamin Joseph’ and turned them on for the offset. I loaded my blade back into the Cameo and cut out the name title!


I wanted the ‘Watch Me Grow’ title to fit across the 12” page and I wanted the lettering to be a bit thicker. To achieve this look, I offset the lettering just an itty bit – 0.050” to be exact - so that the marker would be making two passes for each letter. Here is what it looked like designed in the software:


I then applied an offset to the offset (not sure if there is an easier way to say that!), cut around the lettering and applied the title to my page:

Pretty cool, huh? Before I forget, the plain yellow and blue cardstock is by American Crafts (my favorite) and the patterned paper is from the Creative Memories Seasons Designer Prints pack.
Thank you for reading and I enjoyed writing this guest blog for all of you Sensory Emporium fans! Please make sure to visit The Sensory Emporium’s tutorial on the pen holder for additional information.

Be well!
Jennifer
www.facebook.com/AmeliaAndMeCrafts
AmeliaAndMe.com

Tuesday, May 28, 2013

Dinosaur Party

My son's 4th birthday party was a success! We had so much fun and the fact that I could make all the decorations made me so happy! Here are a few of the decorations I made with my cameo.


Below I will attempt to post a tutorial for the dino food cards. They were such a hit!


Step 1: I start off with 2 2x3 rectangles and the image I want to use.


Step 2: Line up the rectangles and draw a line where they come together. Weld the rectangles together, but not the line you drew. Set this line to cut perforated.


Step 3: Size your image and place it where you want it on the card.


Step 4: Offset your image and make sure it still fits where you want it. Make the offset and the original image a compound path.


Step 5: Duplicate the original line and then use your knife tool to cut along the original line where the image is and cut slits in the bottom portion of your image.


Step 6: Replace the line where it goes. Type out your words and use your favorite method of printing. Either print and cut or sketching. And that's it! You have awesome food cards.

These are available to purchase by custom order. Just message me on etsy for more details.

Tuesday, May 21, 2013

Card Making Love!

Making cards is my new favorite love! Being able to create a unique birthday card or Mother's Day card just makes me so happy. Here are a few I've made recently.


These are this year's Mother's Day Cards. I was so pleased with them!


And my graduation tumbler with matching graduation card.

More to come soon!

Tuesday, April 30, 2013

Custom Decals

One of the things I don't sell on my etsy shop yet, but do offer is custom DIY decals. Price varies depending on size and detail. These were made for a fantastic customer for her daughters engagement party. Photos curtosy of this fantastic blogger.


Monday, April 29, 2013

Sketch Fonts

Today I want to share with you some fonts I use most often with my pen holder. There are a ton of fonts that work great with the pen holder or sketch pens, but these are the ones I use most often. Please feel free to share in the comments the fonts you love to use. I would love to eventually do a follow up post.

I sketched two sets of fonts for you as well as links to where you can find each one. If there isn't a link, it was probably already on my computer. Each font is typed in 36 point. The black set of fonts was done using my pen holder and a Sharpie Ultra Fine marker. The brown set was done using my pen holder and a gelly roll gel pen.


Agency
Allura
Always Forever--http://www.dafont.com/always-forever.font
Andalus
Blackadder
Bradley Hand
Champagne--http://www.dafont.com/champagne.font
Champagne and Limousines--http://www.dafont.com/champagne-limousines.font
City Blue Print
Country Blue Print
Daddy’s Girl--http://www.dafont.com/search.php?q=Daddys+Girl
DJB Jacked Up Kinda Luv--http://www.dafont.com/djb-jacked-up-kinda-luv.font
Edwardian Script
Freestyle Script
French Script
Gabrielle--http://www.dafont.com/gabrielle.font
Georgia Belle--http://www.dafont.com/georgia-belle.font
I Love What You Do--http://www.dafont.com/i-love-what-you-do.font
Janda As Long As You Love--http://www.dafont.com/janda-as-long-as-you-love-me.font
Janda Quirky Girl --http://www.dafont.com/janda-quirkygirl.font
Janda Romantic--http://www.dafont.com/janda-romantic.font
Janda Shine Your Light--http://www.dafont.com/janda-shine-your-light-on-us.font
Janda Snickerdoodle--http://www.dafont.com/janda-snickerdoodle-serif.font
Janda Someone Like You--http://www.dafont.com/janda-someone-like-you.font
Janda Stylish Script--http://www.dafont.com/janda-stylish-script.font
Janda Swirly Twirly--http://www.dafont.com/janda-swirly-twirly.font
Jasmine
Jenna Sue--http://www.dafont.com/search.php?q=Jenna+Sue
Jheri Curls--http://www.dafont.com/jheri-curls.font
Juice
KG A Thousand Years--http://www.dafont.com/kg-a-thousand-years.font
KG Be Still and Know--http://www.dafont.com/kg-be-still-know.font
KG Begin Again--http://www.dafont.com/kg-begin-again.font
KG Call Me Maybe--http://www.dafont.com/kg-call-me-maybe.font
KG Eyes Wide Open--http://www.dafont.com/kg-eyes-wide-open.font
KG Fall For You--http://www.dafont.com/kg-fall-for-you.font
KG June Bug--http://www.dafont.com/kg-june-bug.font
KG Keep Your Head Up--http://www.dafont.com/kg-keep-your-head-up.font
KG Kiss Me Slowly--http://www.dafont.com/kg-kiss-me-slowly.font
KG Like a Skyscraper--http://www.dafont.com/kg-like-a-skyscraper.font
KG One Thing--http://www.dafont.com/kg-one-thing.font
KG Seven Sixteen--http://www.dafont.com/kg-seven-sixteen.font
KG Skinny Latte--http://www.dafont.com/kg-skinny-latte.font
KG Somebody That I Used to Know--http://www.dafont.com/kg-somebody-that-i-used-to-know.font
KG Strawberry Limeade--http://www.dafont.com/kg-strawberry-limeade.font
KG True Colors--http://www.dafont.com/kg-true-colors.font
KG Ways to Say Goodbye--http://www.dafont.com/kg-ways-to-say-goodbye.font
Lavanderia
LD Dainty From SIL Store
Miss Smarty Pants--http://www.dafont.com/miss-smarty-pants.font
MTF Cindy--http://www.dafont.com/search.php?q=MTF+Cindy
MTG Cupcake--http://www.dafont.com/search.php?q=MTF+Cupcake
The following Pea Fonts can all be downloaded here: http://kevinandamanda.com/fonts/fontsforpeas/ there is a link to the side that will allow you to download all of them.
Pea Amy Jo Jo
Pea Ash
Pea Britney
Pea Emma Kate
Pea Hannah Vanilla
Pea Heather Michelle
Pristina
Santas Sleigh--http://www.dafont.com/santas-sleigh.font
Shardee
Shit Happens--http://www.dafont.com/search.php?q=Shit+Happens
Simply Glamorous--http://www.dafont.com/simply-glamorous.font
Sweetly Broken--http://www.dafont.com/sweetly-broken.font
Tangerine--http://www.dafont.com/tangerine.font
Throw My Hands Up in the Air--http://www.dafont.com/throw-my-hands-up-in-the-air.font
Vivaldi
Valdimir Script


Wednesday, March 6, 2013

Mission Statement

My customers are important to me. So my mission statement packs in whole lot more than what a few lines can portray. I want to provide quality items that you will feel good about displaying in your home, or giving to your child. I want to create a trusting relationship with each of my customers. If I can't make it or answer your questions, I want to be able to direct you to someone who can and other resources. I want to provide the best customer service in any way that I can. These are things I want personally and for my business. These are the standards I have set. So without further ado, I give you my mission statement:


The Sensory Emporium strives to provide quality items that engage the senses. Each accessory for the home, mom, or baby is carefully handcrafted with love and passion.

Wednesday, February 20, 2013

Tutorial--Making a Word into A Heart on Silhouette Studio

Hey everyone! There have been a lot of requests for different words or names made into a heart on one of my Silhouette groups, so I thought I would do a quick tutorial. This is really my first Silhouette tutorial, so if you have any questions, please ask.


This is the heart I use. Find one that works well for you. I found that this one works better than trying to use a fancy heart.


I'm using the font Impact at size 144 to start. You can use other fonts, but I found this one easiest to get started with. After you've typed your word, ungroup all the letters. Do not release compound path as this will make the middles of your letters ungroup as well. Using ungroup will just ungroup the letters from each other.


Manipulate all the letters so they overlap the heart. I use the corner stretching and the top/bottom and side stretching. This takes a little adjusting. Don't worry about making sure all points over lap the heart at this time, we'll fix that next.


Duplicate your heart. Now you have the extra one and the one around your word.


Highlight your word and your original heart and then select crop from your modify tool box. You should get something that resembles the above picture. Then line up your duplicated heart so it lines up flush with the crop (I forgot to take a screen shot of this step).


Now zoom into your image and work through your letters. Double click on them so you are able to manipulate the points. Pull each letters points so they are flush with the heart. Like in the next picture.


I actually pull my points just past the heart and you'll see why in a second.


Okay, now you've got a big ol' mess that looks like this. I've also duplicated my heart again, just in case. You're going to highlight it all again and hit crop again.


And that's it. If you need to, you can drag your heart over and play with the points again to get the look you want. Like I said, if you have any questions, please message me. I hope this tutorial was easy to follow.

And if you're coming here looking to just purchase this done in vinyl, visit my facebook.