Monday, December 2, 2013

Addressing Envelopes with your Silhouette Cameo

Are your hands cramping from addressing all those Christmas cards?  Every year we send out 40 cards and I get so tired of writing out every single address.  My hands cramp, I get bored and lets face it, my hand writing isn't always the best; especially when I'm tired.  So this year, I'm letting my cameo do the work and it's easier than you might think. I'm going to show you how and let you in on a little secret!

So first you're going to want to design your envelopes in Silhouette Studio. I size my paper to the size of my envelope. My envelopes for my photo cards this year is about 4x8.  Then design your envelope with your return address and your loved one's address.

Now you can either type each address in individually or you can copy and paste from your computer. If you copy and paste, don't click on the text tool first. Just make sure nothing is selected and right click and paste. Font used is Daddy's Girl

So here is the secret.  I'm going to show you how to sketch these without unloading your mat!
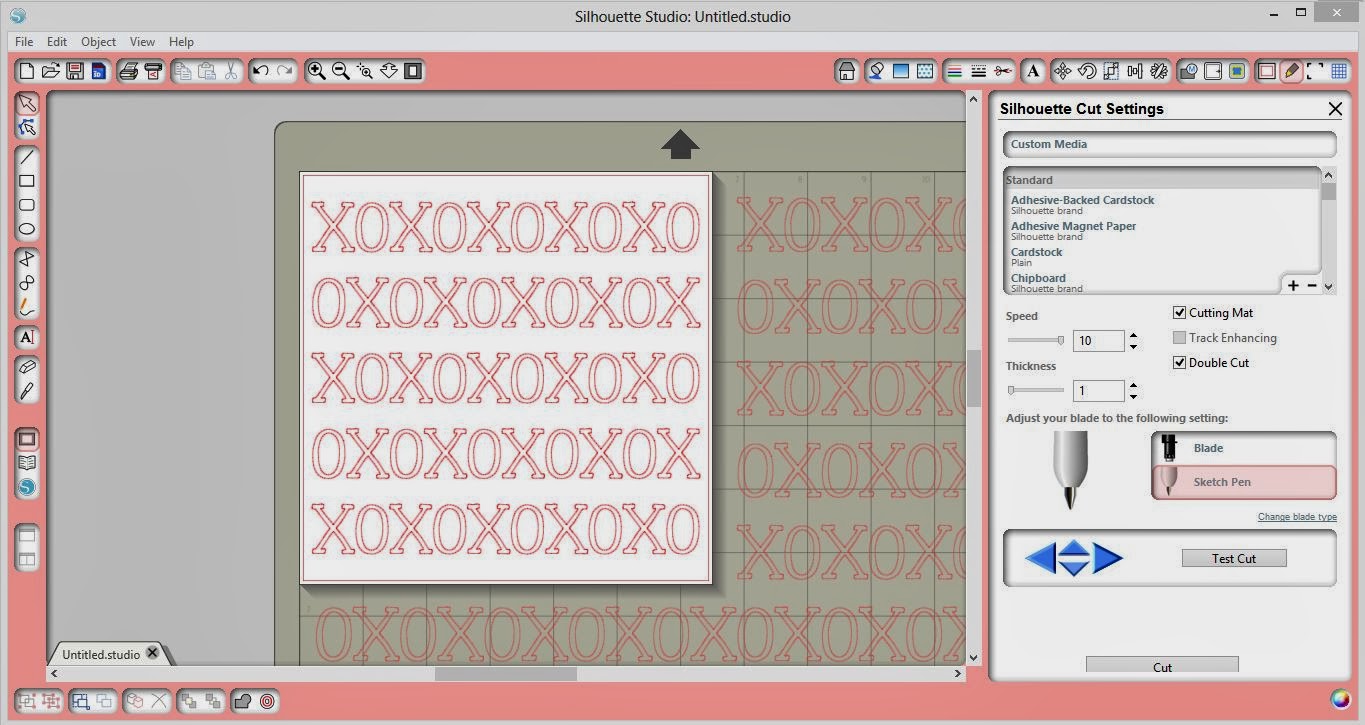
Draw a 4x8 rectangle (or shape of your envelope) and arrange it around your addresses so it looks like what you want to sketch. Turn the cut line off on the rectangle.  Move it all down on your mat.  I have my design sitting on the 2 inch and 5 inch line.  You can see my virtual envelope in purple.  To see where to line it up, click on the page menu (highlighted above) and reveal cutting mat 100% (also highlighted).

Line your envelope up on your mat in the same spot as where it is in Studio.  Like this.  Please excuse my dirty mat, it gets used a lot and this is my paper mat.


I added some snow flakes, and moved my return address over a bit because I was afraid the pen would catch the edge of the envelope, but you get the idea.  Now, don't unload your mat.  Take this envelope off and put your new one on in the same spot.  Cut again with your next address!  How easy and quick is that!

Takes me about 20-30 seconds from start to finish. And, no hand cramps!  I may never write out an address again! 

Tip: Don't use super fancy fonts. I was told that the postal workers don't like that. So use a nice, easy to read font. For a list of fonts that appear to be single lines click here.

So I hope you enjoyed that little tutorial and can get through your Christmas cards in no time.  What's that? You don't have a pen holder yet? Click here to order one.


Wednesday, November 13, 2013

Card Display Garland

My son had a zoo theme for his 2nd birthday...he'll be 5 in May.  One of his decorations was this really cute garland with zoo animals on clothes pins and I hung a picture of him from each of the animals. I believe in reusing, so for the last 2 years, we've been using that garland to hang our yearly cards from.  I always had the intention of updating it...but here it is 2 years later...

And you know what?? Those are still cards from my daughters 1st birthday almost a year ago.  So while looking at that the other day, I decided that either A: I'm bored with hanging cards that way or B: I'm bored with it because I haven't updated it.  I decided that A wasn't quite it, so on to B.  Time to change it up.  I looked everywhere for foam shapes that would be good for all year round...didn't happen. So on to making my own.

For this project, I knew I wanted something that was going to last year round and I wanted to use my cameo to do it.  I didn't really feel like paper piecing, so sketching was my next option. 

Next I had to tear apart the zoo animals and decide what I wanted to put up instead.

I decided birds is kind of a running theme throughout my house, so some cute sketchy birds would be perfect!


Source:http://sweetclipart.com/cute-bird-line-art-17


I used this bird, traced him in Silhouette Studio and then duplicated him on top of himself a couple times to give him a more sketchy look and offset so I had a cut line. For a sketch and cut tutorial, click here.

 
Cute right?  I just love him!


Just for the purpose of this post, my daughter's birthday cards did go back up, but they will be coming back down soon.  Time for Christmas Cards!!!
 

Tuesday, November 12, 2013

Thank You


October 22nd marked the one year anniversary of my first pen holder sale on Etsy.  And I just want to say thanks to everyone who has purchased one or is thinking about purchasing one.
 
 
Since the day my son was born, all I have ever wanted to do was stay at home with him.  So I started creating stuff to provide a small extra income that would hopefully someday provide enough to buy his school clothes and allow us to do extra fun things or just to have lunch without having to tap into our single income budget.  Selling pen holders has not only allowed us to do all of that but it also allows me to grow my crafting business, which is my second love.  So thank you.  You think you just purchase a pen holder to do some fun crafting, but what you really purchase is opportunity for my family and me.


Monday, November 11, 2013

Sketching on Fabric

I wanted to try something new; to sketch on something I've never sketched on before.  I use paper all the time and I've even tried vinyl and shrinky dinks.  All very fun projects and great uses for my pen holder.  However, I have never sketched on fabric before. 

What you'll need:
Fabric (any size, this is 6.5x6.5)
Pen Holder
Marker (I used Sharpie, but I'm sure there is a thin fabric marker out there that might work better)

So all I did was cut my fabric 6.5x6.5 inches. This is going to be a mini pillow for my daughter's babies but I have a million more ideas circling in my head.
You just load your mat with the fabric on it the same way you would paper or anything else you are sketching on.
Set up your silhouette screen.  I just drew some Xs and Os really quick.  I was originally going to do this 12x12 so that's why there are so many extra. The font for this project is KG Be Still and Know found on Dafont.com. You are then going to want to set your settings to thickness of 1, speed whatever you want, I used 10.  And make sure sketch pen is selected. I also have it double cut but my marker is a little dried up.
 

Then watch it go! This is my favorite part. I always watch my machine work.

All done sketching!  Oh yeah, I should mention.  I grouped the two red ones and told them not to cut first and changed my pen out and reselected them and told them to cut and the black ones not to cut. Got that?

And here it is.  Just cut another piece of fabric and sew it to the back. Sewing would be a whole other tutorial, but it's really easy.  This still needs it's stuffing and the bottom closed, but for you all this is good enough.
 
So yeah, sketching on fabric...who knew?  I love it. I'm thinking muslin bags, more pillow designs, garden flags...got any more ideas for me?
 
Please take the time to visit these great sites for more project inspiration!
DIY Ironing Board Hanger by The Turquoise Home
Silhouette Challenge: Time Zone Bathroom Art by Nearly Handmade
Santa's Christmas Countdown by Tried & True
Nautical Anchor Pillow Tutorial by The Thinking Closet
Christmas Card Ornament with Free Cut File by unOriginalMom
Thanksgiving and Christmas Dual Sign by Architecture of a Mom
Itching to Etch by Get Silvered
Snowman Tag ~ Silhouette Challenge by Whats Next Ma
Thanksgiving Sign by Chicken Scratch NY
DIY Horse Silhouette Pillow by Rain on a Tin Roof
Sketching on Fabric by The Sensory Emporium
Paper Leaf Garland by Lil' Mrs. Tori
DIY Blessing Board - Silhouette Challenge by One Tough Mother
Christmas Pillow by Create & Babble
Glass Painting with Reverse Stencils by Givemeapaintbrush
Chalkboard Thankful Tree by Cutesy Crafts
Bottoms Up! MYO Wine Tag by From Wine to Whine
'Happy Holly-days' Tags for the Swap by An Elegant Touch...
Thank You for Dinner (Card) by Everyday Paper
DIY Flyleafs for Planners or Albums by The House on Hillbrook
Advent Star Christmas Countdown by My Favorite Finds
Geometric Fabric Bowls by Please Excuse My Craftermath...
Paper Carnival by Home At Eight
Silhouette Cameo Tutorial: Dual Sided Business Cards by Black and White Obsession
In Case of Emergency Baby Bag Tags by Tossed Salad Life
Christmas On My Mind by Creative Turn
Jingle all the Way! by My Paper Craze
Christmas Lights Garland by Making Home Base
We Are Thankful by 4 You With Love
Seattle Skyline Silhouette by Sowdering About in Seattle
DIY Stenciled Mugs by Coley's Corner


Monday, October 28, 2013

Sketching Large Files

So you've designed the perfect thing to sketch and cut. Lots of colors, lots of things to sketch but when you go to sketch, your program freezes.  Have no fear! I can help you.  All you have to do is separate the different colors to their own file.  So, you'll make a new document for every different color you have, making several smaller, more manageable files. 

I made these labels today for my Christmas packages.  To view how to sketch and cut, view this tutorial.  This video will just show how to simplify larger files so your program won't freeze.


Thursday, October 10, 2013

Cute Postage Labels and Pen Holder Tutorial

Hey everyone! I've had several requests to do a video on how to use my pen holder. So I finally got around to it (read: found a screencast program and got the nerve to do it). I made these really cute labels for my packages. I'm old fashioned and I go to the post office to mail my packages and I thought they needed something to cutsie them up!

These were made using my pen holder and Gelly Roll Gel Pens. So I hope you enjoy my video and now that I know how to do it and have some confidence in it, I hope to bring you more video tutorials.


Saturday, August 31, 2013

Project Inspiration--Pregnancy Journal

Okay, it's been a very long time since I've posted. I just haven't felt inspired lately and it's been same ol' same ol'. Anyway, I created an awesome gift for a friend of mine who just found out she is pregnant. I can't wait to give this to her!

This is the cover. I used my pen holder, gelly roll gel pens and scrapbook paper. I also picked up some embellishments from Michaels to help me out a little. I had just today to complete this project, so not a lot of time to create my own embellishments.

Quick look at all the pages. I made some of the pages, pocket pages so she could stick mementos in there, extra journaling or whatever she wants. I created those by first drawing a box the size I wanted it and then extending it about a quarter inch. Then I draw a line that will be perforated on three edges. Maybe I'll do a tutorial for that sometime, but it's pretty simple.


And I can't figure out why some of these are flipped. Driving me crazy today...so tilt your head or your screen. Ha ha. Have a great day and I hope this post inspired you!